Other Projects

Dye Easter Eggs with Shaving Cream

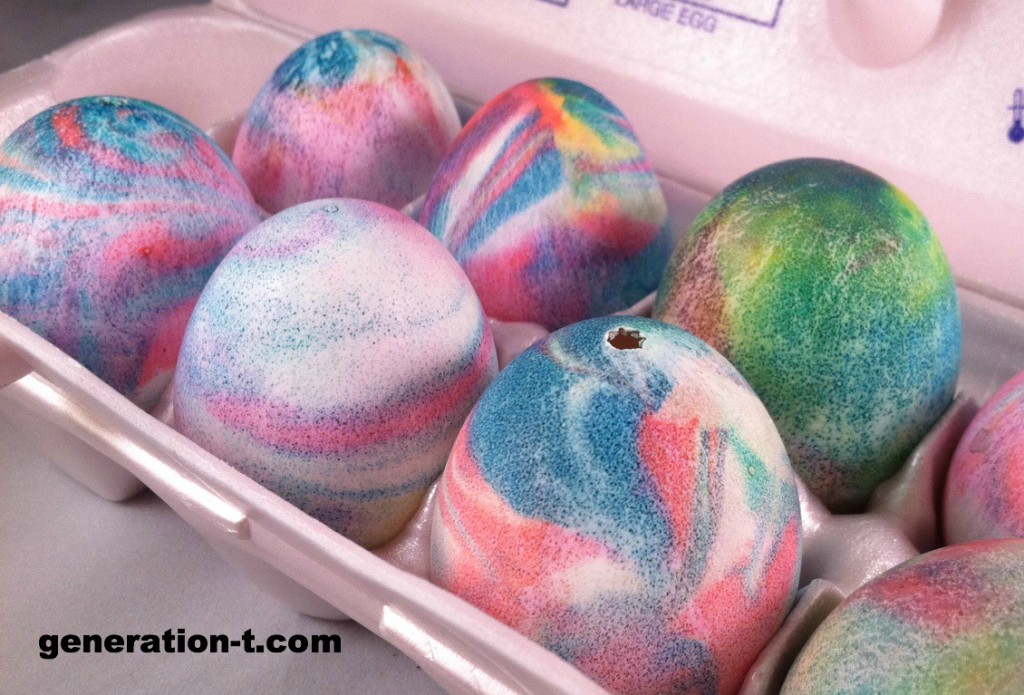
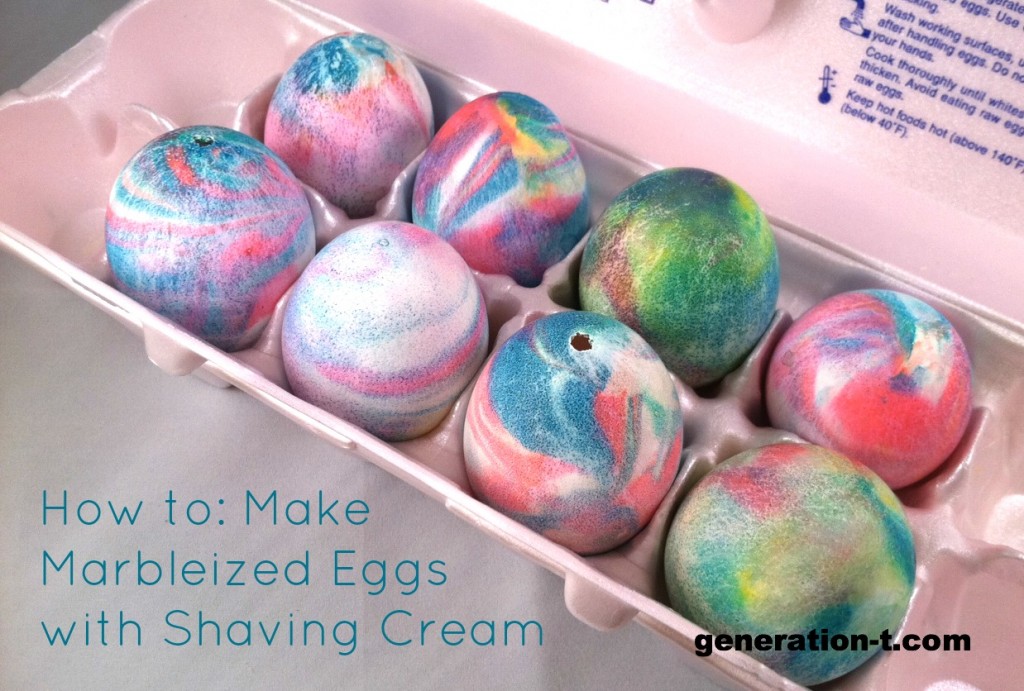
Okay, we kicked off a week of non-T-shirt-related posts with the Glitter Dot Easter Eggs yesterday, because as teased last week, I taped a bunch of how-to videos for About.com and since so many of them are Easter-themed, that’s what’s comin’ atcha! I’m definitely not the first person to use shaving cream and food coloring to dye my Easter eggs, but the amazing marbleized effect on the surface of the egg is so irresistible…

Materials:
-eggs (blown or hard-boiled)
-food coloring
-foaming shaving cream
-plastic spoon or knife
-bamboo skewer
-drying rack
-paper towels
-a timer (4-5 minutes)

Make it:
-Click below to follow along with the video tutorial for Marbleized Eggs with Shaving Cream for About.com.

Update: I heard from a commenter that you can do this technique with Cool Whip, too! Have you tried it?


[ 1 Comment | Posted on March 27th, 2013 ]

iLoveToCreate: Glitter Polka Dot Easter Eggs

I’m pretty traditional when it comes to decorating eggs at Easter time (dollar store egg dying kit, anyone?), but to be honest, it was getting kind of dull year after year. So this year, I dug through my craft stash to find a material that might have good crossover potential — one that was likely developed for one particular use (say, scrapbooking) that I could easily apply to something else (like Easter eggs). And voila!

Bring on the polka dots! Bring on the disco sparkle! The best part? No waiting around for dye to set or glue to dry. This is egg decorating with immediate (and rather shimmery) results.

For materials for the project and how to make these sparkle-riffic eggs, click below to watch the video tutorial I did for About.com and/or follow the step-by-step illustrated instructions (and a variation) at iLoveToCreate.com!


[ 2 Comments | Posted on March 26th, 2013 ]

How to: Make a Starter Embroidery Kit

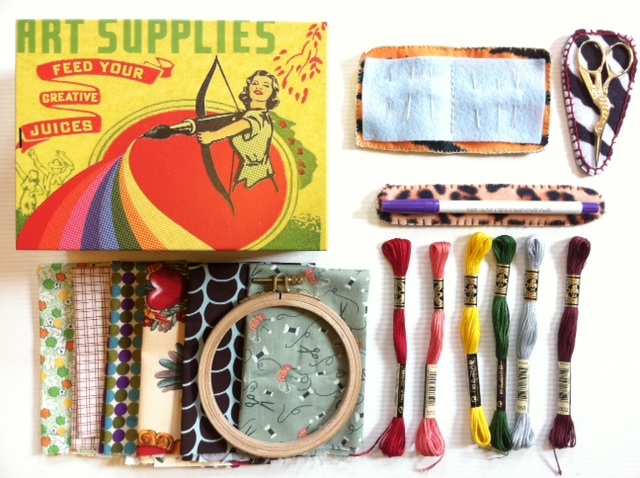
As you may know, my niece became very enthusiastic about embroidery over the holidays, and now that another very important holiday is upon us (her 6th birthday, of course!), I decided to put together a personalized “my first embroidery kit” for her. It has a combination of store-bought and handmade elements, so you can make your shopping and DIY lists accordingly.

Here’s what I included:
Tin box (or a basket, or a small tote bag)
-6 swatches of about 10″ by 10″ fabric (snipped from my own fabric stash — lots of geometric patterns for easy stitching)
-6 skeins of embroidery floss in different colors
-4″ wooden embroidery hoop
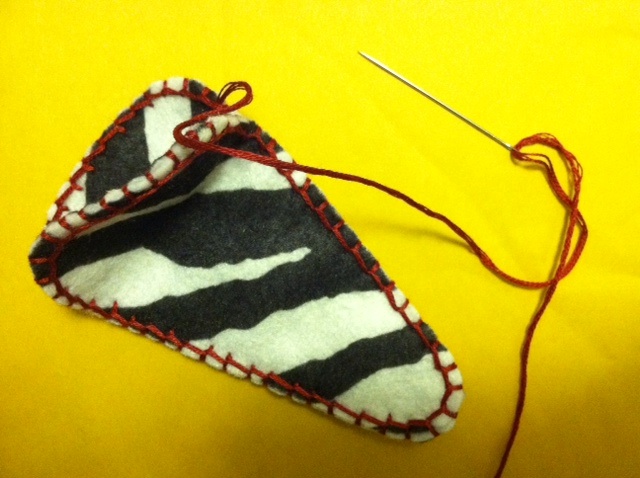
-Classic stork embroidery scissors and a felt sheath
-6 needles and a felt case
Disappearing ink pen and a felt sleeve

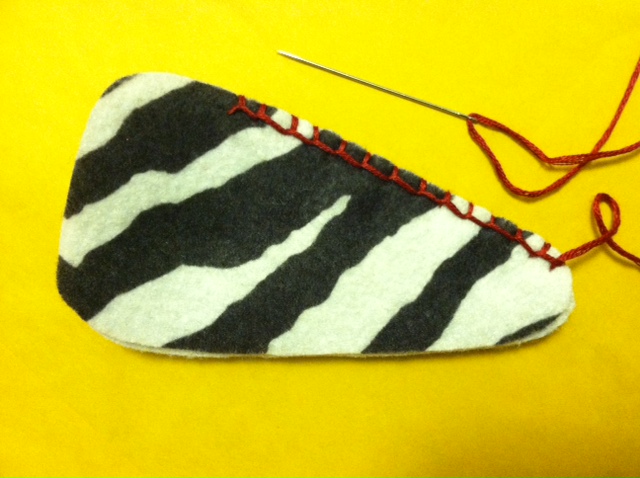
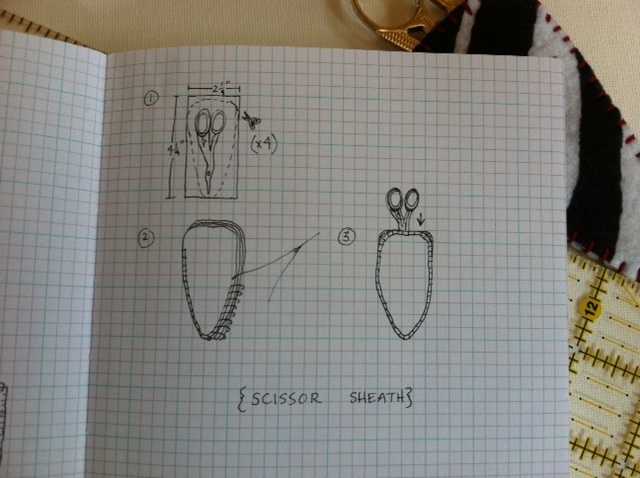
To make the scissor sheath, trace about 1/4″ to 1/2″ around the scissors on a piece of felt (tip: use the disappearing ink pen before packaging it up!). The shape should be approximately 4 1/4″ by 2 1/4 at its longest and widest.

Cut four matching pieces of felt using the tracing as your guide. If you’re using printed felt (with a right and a wrong side), pair off the four pieces, wrong sides together.

Then sandwich all four pieces together and blanket stitch along the edge with a contrasting color embroidery floss. Starting about 3/4″ from the top, stitch around the bottom of the sheath (where the point of the scissors will rest) through all four layers, then stop again on the other side, 3/4″ from the top.

Without tying off the thread, stitch through only two layers at a time to finish the edges at the top of the sheath (where the scissors will be inserted).

Tie off and snip the thread, and insert the scissors! Here’s a diagram from my sketchbook as a refresher:

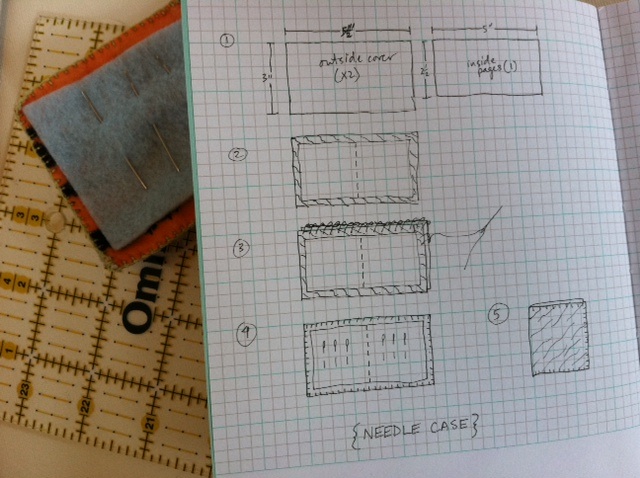
For the needle case, cut two 3″ by 5 1/2″ felt rectangles for the cover and one 2 1/2″ by 5″ rectangle for the inside page (1). Center the inside page on the right side of one of the larger rectangles and sew a straight running backstitch along the center to create the interior “spine” of the needle case (2). Then sandwich the second larger rectangle against the first, wrong sides together, and blanket stitch around the edges (3)! Arrange the needles onto the inside page (4), and fold the book closed (5).

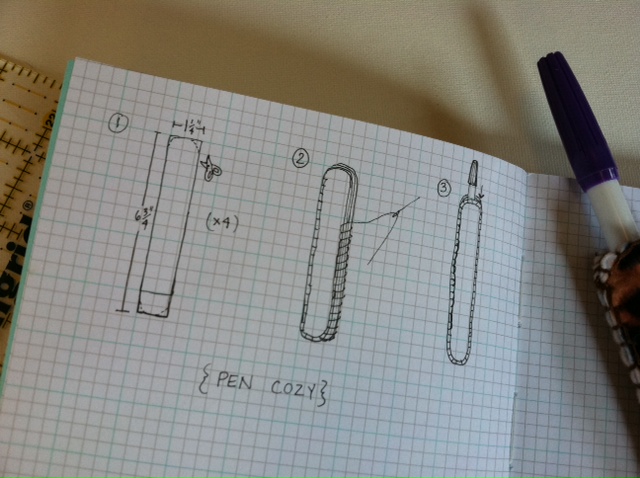
For the disappearing ink pen sleeve/cozy, cut four pieces of 1 1/4″ by 6 3/4″ felt rectangles (1). Stack them together as you did the pieces of the scissor sheath and blanket stitch them the same way: through all four layers and then through just two layers at a time around the opening (2). Tie off the end, snip the thread, and insert the pen (3)!

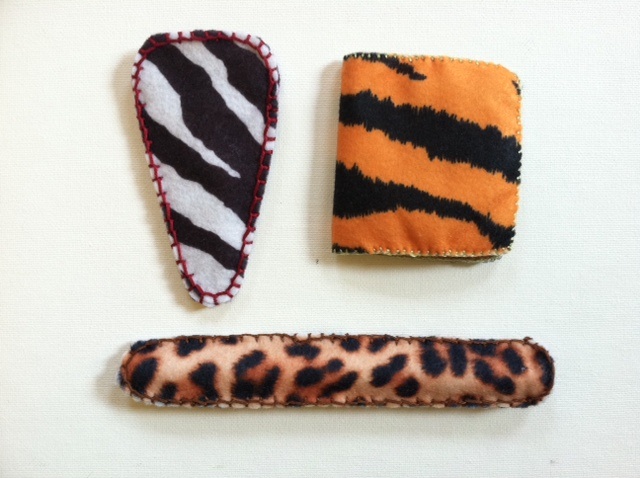
Here’s a look at the finished felt DIY components.

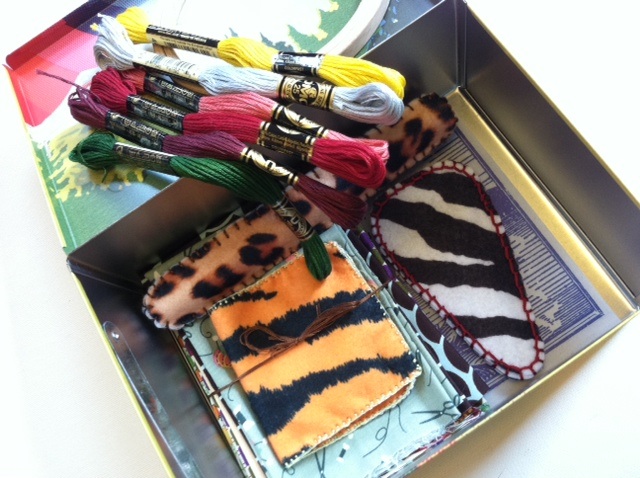
Then it’s time to assemble everything. Make sure it looks nice and neat — because it’s likely the last time it’ll look that way!

What would you put in a first embroidery kit? I thought about some iron-on patterns, but for now I think she’s at the stage where she’s experimenting and doing her own thing (but I’ve got my eye on this one for future gifting!). I also thought about including a stitch card (there’s a tear-out one from this book and I was tempted to include the one from my copy).

[ 4 Comments | Posted on June 7th, 2012 ]

I Love to Create: Paper Flowers 4 Ways!

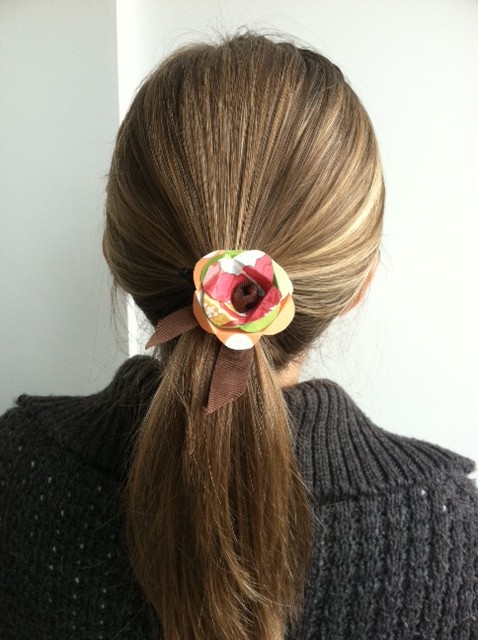
I’ve been playing with paper a lot lately over at my day job, so was inspired to dig into my own paper stash for this month’s iLoveToCreate project. With plenty of time until Mother’s Day, here’s a delicate flower that can be applied four different ways to create a non-wilting “bouquet” for her hand, her head, her hair, or her lapel.

Materials:
-Paper scrap for template (brown paper bag or a sheet from the printer paper recycling) at least 3″ x 3″
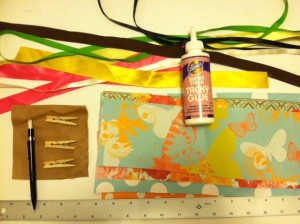
-Decorative paper scraps (card stock, book pages, paper bags, thick wrapping paper, etc., in variety of colors)
-All-purpose scissors
Aleene’s Tacky Glue and clothespins OR Aleene’s Tacky Dot Rolls
-Pencil
-Ruler
-Ribbon of varying colors, widths, and lengths

Make It:
1. Fold the paper scrap in half three times to create a folded “wedge.” Cut a curved edge about 1 1/4″ from the point.

2. Unfold the template (it’ll look a little like a four-leaf clover), lay it flat and trace it three times on one or more of the decorative paper scraps. Three tracings makes one flower.

3. Cut around the tracings to make three identical blossoms. Snip two straight lines into the center of the first blossom, cutting out a wedge equal to two “petals.” Cut three petals from the second blossom, and four petals from the third blossom. Mark and then cut a 1/4″ semicircle from the center of each blossom, as shown.

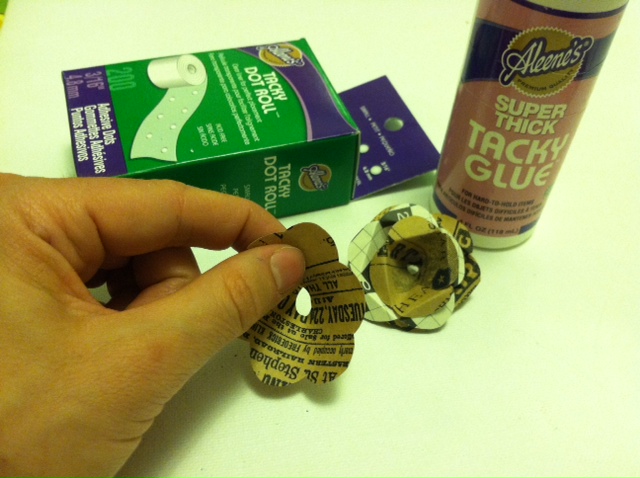
4. Curve each of the blossoms to the cut edges overlap a bit. Adhere with glue or dots, let dry if necessary, then fold back the tips of the petals.

5. To make a flower ring, nest the blossoms inside one another. Select a piece of ribbon, wrap it around your finger, and knot the ends so the loop fits your finger. Gently thread the loop through the center of the flower, so the knot catches and rests in the center of the flower. Trim the ends of the ribbon as desired.

6. Slip the loop over your finger and the ring is complete!

7. Return to your paper stash and repeat the process to make more! You can personalize your bloom using crayons and card stock (a sweet way for younger kids to get involved if it’s a Mother’s Day gift), go for a more muted geometric design using pages from an Japanese puzzle magazine, gather up some vintage appeal by cutting into that newspaper-printed paper gift bag, or simply dig into the scrapbooking scraps for some playful color.
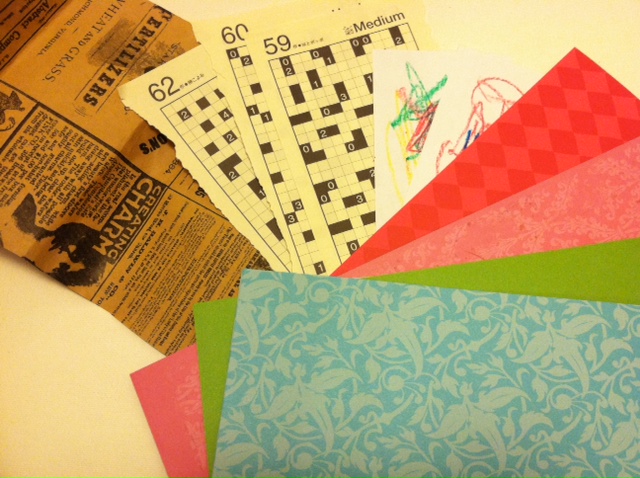
8. Keep your flowers uniform and muted…
…or mix and match the colorful blossoms in a paper botany experiment!

9. To make the headband, brooch, or barrette, thread one end of the ribbon through the flower, back to front, knot it, and then thread the end back through the flower, front to back. Thread multiples together this way, too! Wrap the ends of the ribbon around the headband, brooch, or barrette base and glue or knot to secure it.
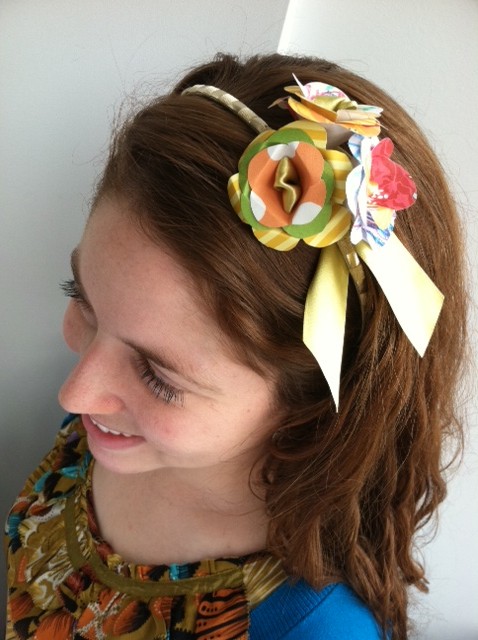
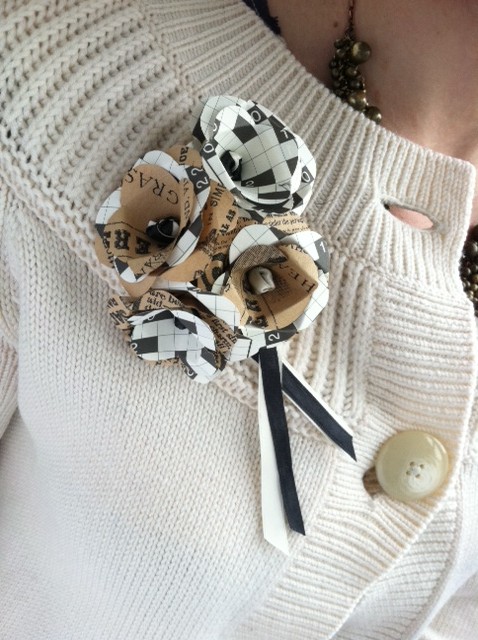
And now, the million-dollar question for the author of Generation T: Can you make these flowers with T-shirts? Absolutely! Substitute fabric glue for the adhesive, and trim the neckline of a shirt with these sweet little blooms.


[ Comments Off on I Love to Create: Paper Flowers 4 Ways! | Posted on April 24th, 2012 ]

iLoveToCreate: Upcycled Paperclip Necklace

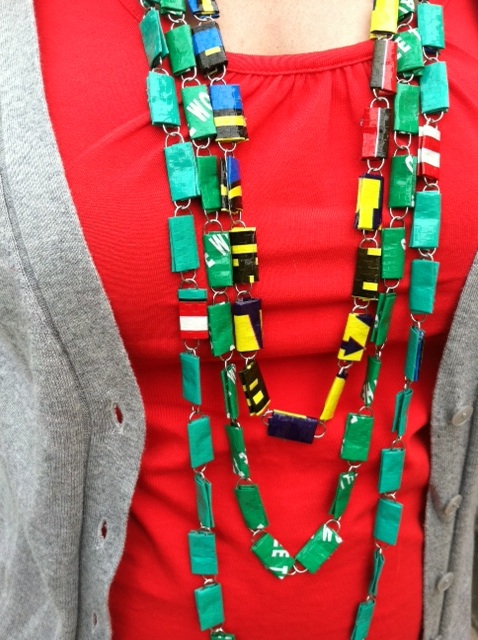
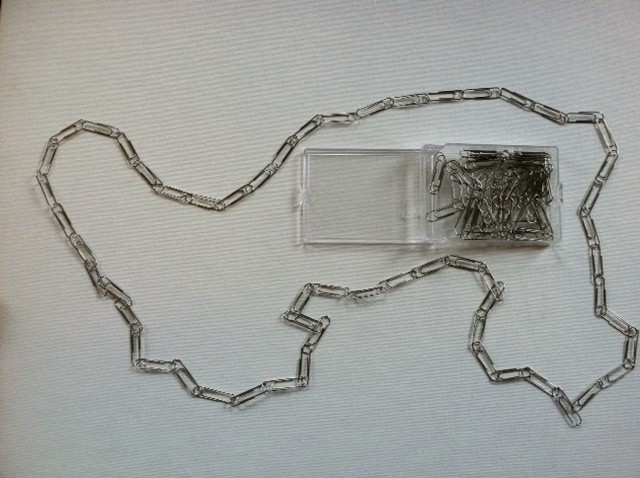
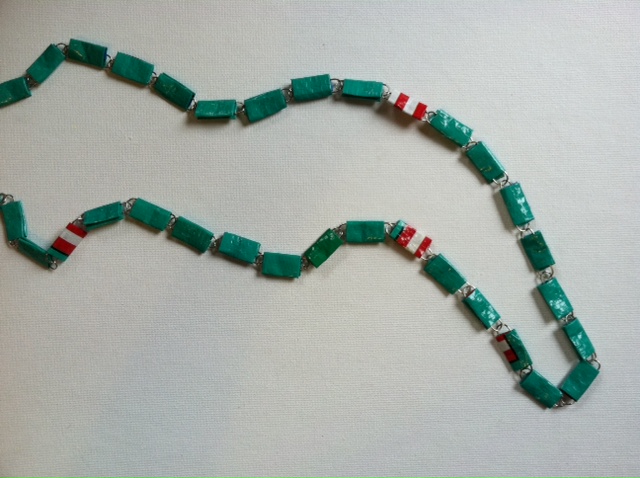
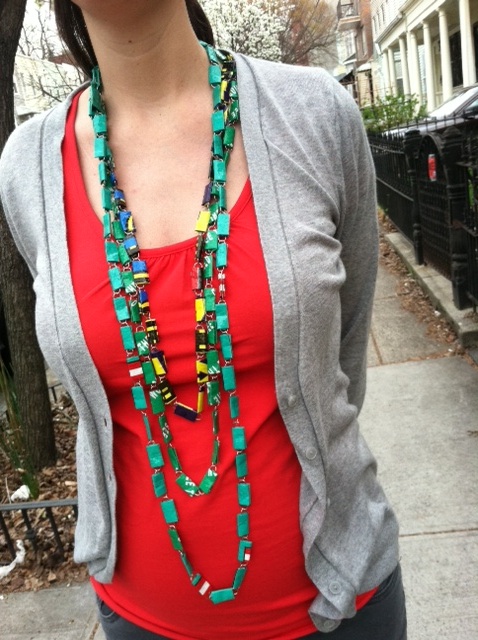
Here’s to a colorful and elegant twist on that old office cube classic: the paperclip chain. I was inspired to make it after spying a similar necklace that my friend Rebecca was wearing in the office a couple of weeks ago. When she told me that she scored the amazingly simple accessory while on vacation in Cambodia earlier this year, that’s when I experienced the creative flash of an I-could-so-make-that moment: Seeing as I won’t be able to afford travel to Cambodia anytime soon (I wish!), I decided to set out on a far more affordable trip…to the local 99-cent store.

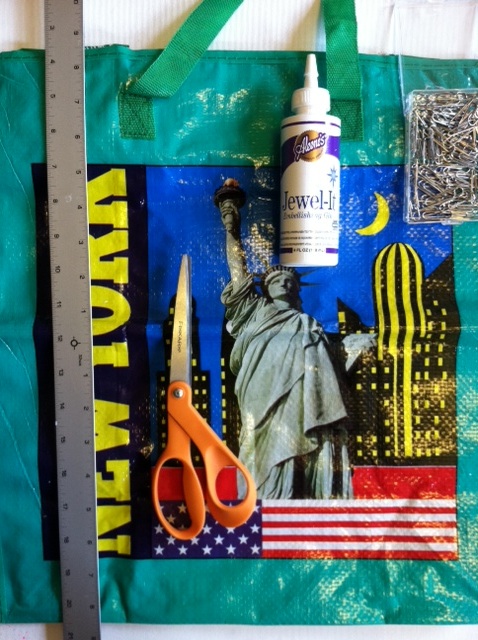
Materials:
-box of paperclips
-all-purpose scissors
-ruler
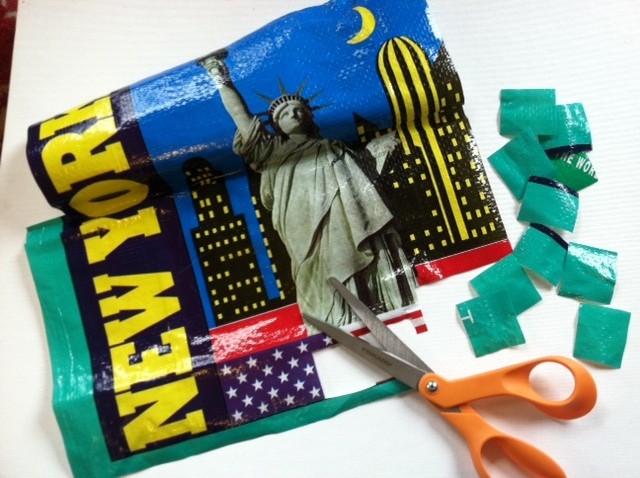
-woven plastic material (laundry bag from the dollar store, an Ikea shopping bag, all-purpose tarpaulin from the hardware store)*
Aleene’s Jewel-It Embellishing Glue

Make it:
1. Link 38 to 48 paperclips in a chain. Hang the chain around your neck, see if you like the length, and add or subtract paperclips to your liking.

2. Measure and cut one 1 1/2″ by 1 1/4″ rectangle from the woven bag. Use that rectangle as a template to cut more rectangles. Cut as many rectangles as there are paperclips in your chain.
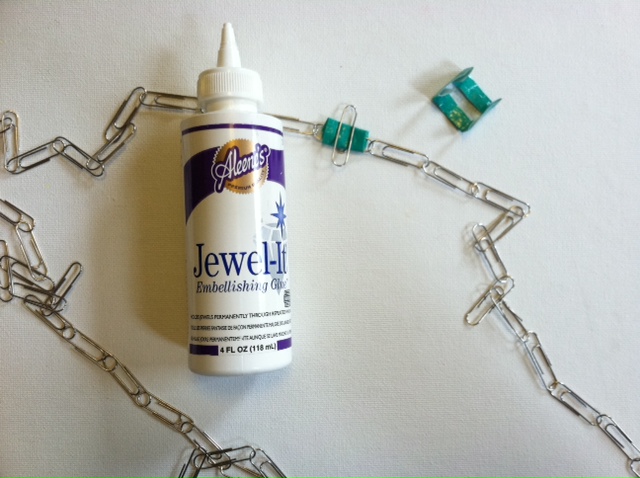
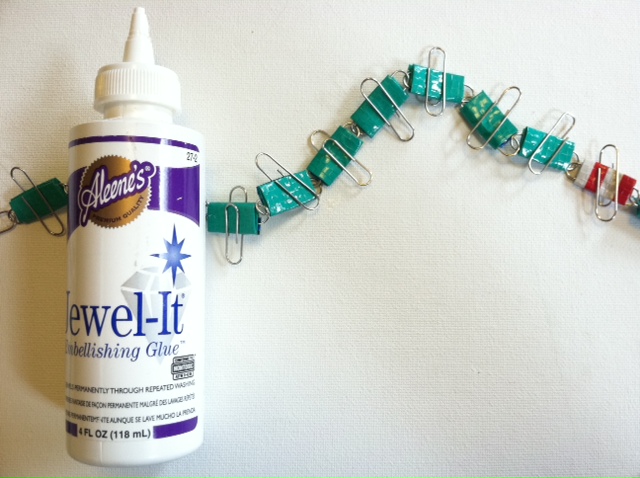
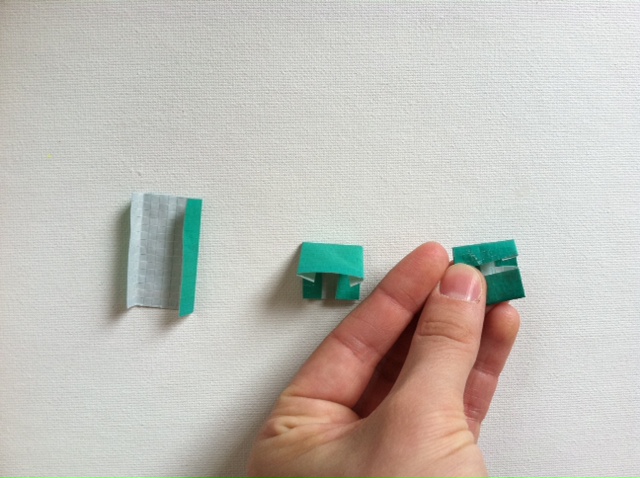
3. Select one rectangular piece. Fold the long sides in 1/4″ and crease. Then fold the piece in half lengthwise, crease it, and unfold. Fold the two short ends into the center line and crease again.

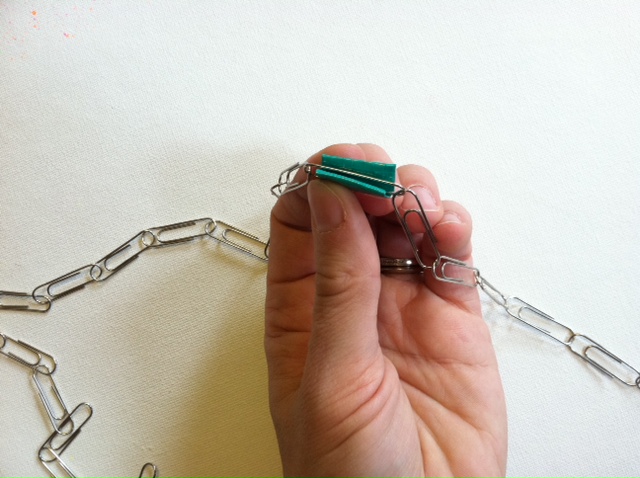
4. Refold the center crease, pinching the piece around the center of a paperclip in the chain to create a sort of “bead.”

5. Squeeze the glue generously along the open edge (the motion is sort of like mustard on a hotdog). Pin it in place with a spare paperclip to dry.

6. Repeat with the remaining rectangular pieces until every link on the paper chain is covered by a bead. Let the beads dry completely before removing the spare paperclips.

7. Remove the paperclips, touch up any finicky beads with an extra dab of glue, and repeat the entire process as many times as desired to create multiple colorful chains.

8. Drape them around your neck, and off you go.

Happy National Craft Month!

*Incidentally, these necklaces are made from the same sort of bags that Rami made his chic challenge-winning Project Runway All-Stars dollar store dress from, below! What a cool material to play with.

All photos by Megan Nicolay except for the Project Runway screenshot, via SheKnows.com.

[ 4 Comments | Posted on March 27th, 2012 ]

ILTC: Ryan Gosling’s Scorpion Jacket

Hey Girl.

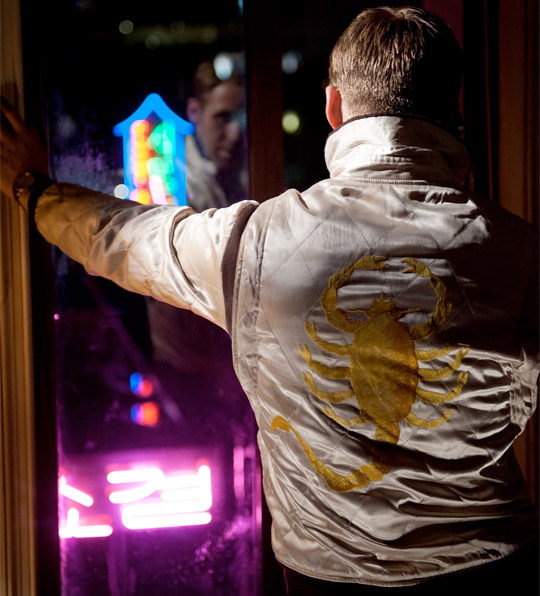
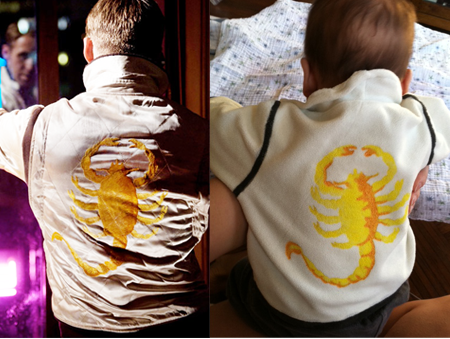
As one popular Tumblr ode to Ryan Gosling says, he’s “your favorite sensitive movie dude-turned-meme.” Another Tumblr puts it more bluntly. And a recent video by Gosling doppelganger Joey shares “How to Look Like Ryan Gosling.” Which got me thinking about snagging Ryan Gosling’s style. Forget the hoodie and well-groomed 5 o’clock man-scruff. I mean, did you see that embroidered scorpion jacket he wore in Drive? If you didn’t, well, feast your eyes:

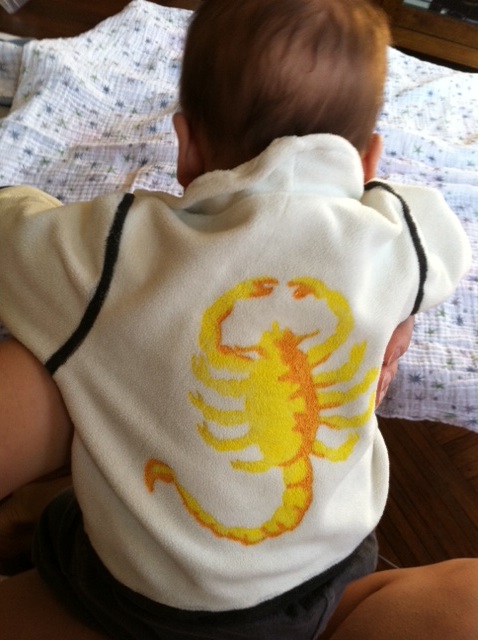
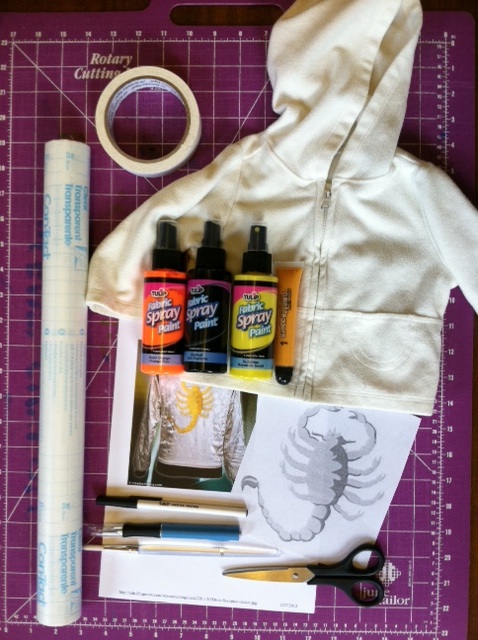
You can actually buy it — oh, but making it would be so much more fun. And so, for my newest iLoveToCreate blog post, I set out to make some sweet scorpion threads inspired by that original jacket — no satin quilting, no embroidery, just a white jacket from a thrift store and some fabric paint. And since my favorite new sensitive dude happens to be pint-sized, I’ve decided to make it in miniature for my little gosling. (Note: These instructions can produce a version for a full-sized goose as long as you start with a full-sized jacket!)

Materials:
-White
zip-front jacket or sweatshirt
-Pen
-Contact paper
-Craft knife and cutting mat
-Masking tape
Yellow fabric paint, brush or spray on (for scorpion)
Orange fabric paint, brush or spray on (for highlights)

Black fabric paint, brush or spray on (for trim)
Paint brushes (optional)
-Sewing machine threaded with white thread (optional)
-Scissors (optional)

Make it:

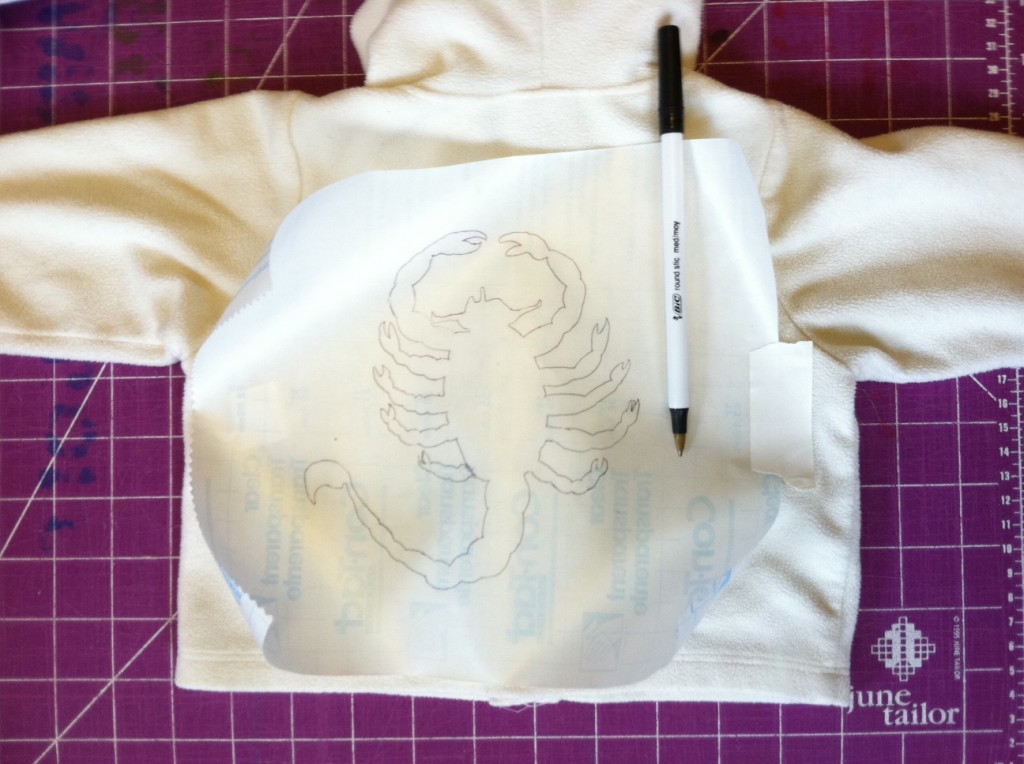
1. Lay the jacket flat and measure the approximate dimensions of the back panel. Cut a piece of contact paper to those dimensions. Draw or trace the outline of a scorpion onto the paper.

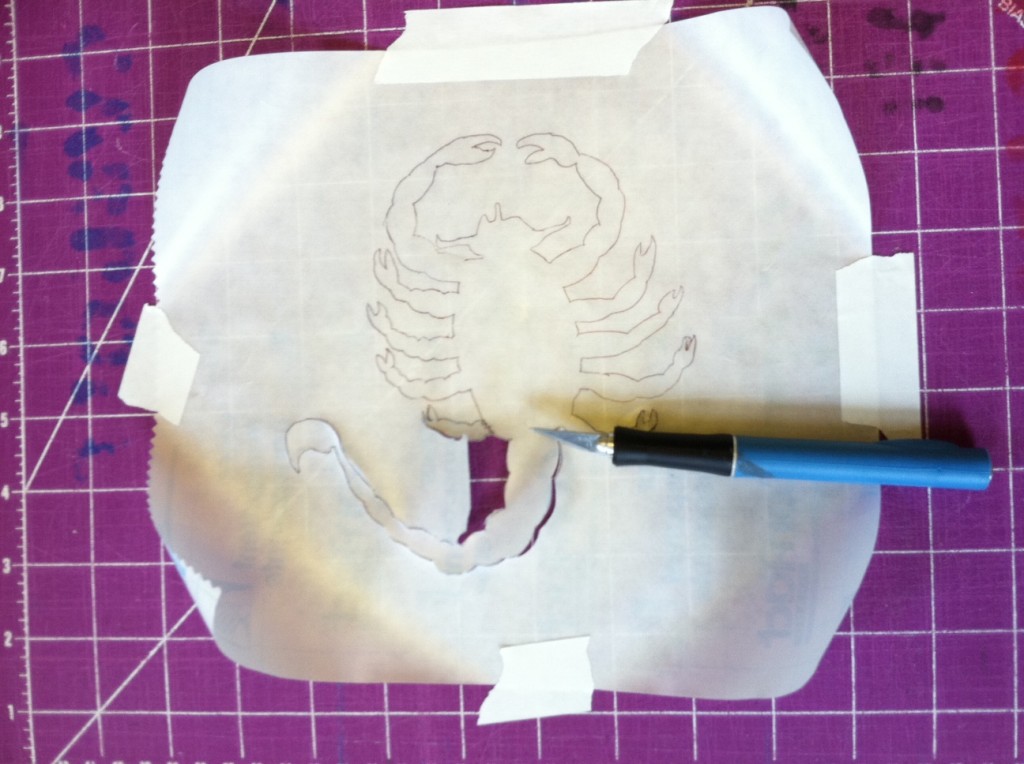
2. Use the craft knife and cutting mat to cut out the contact paper stencil.

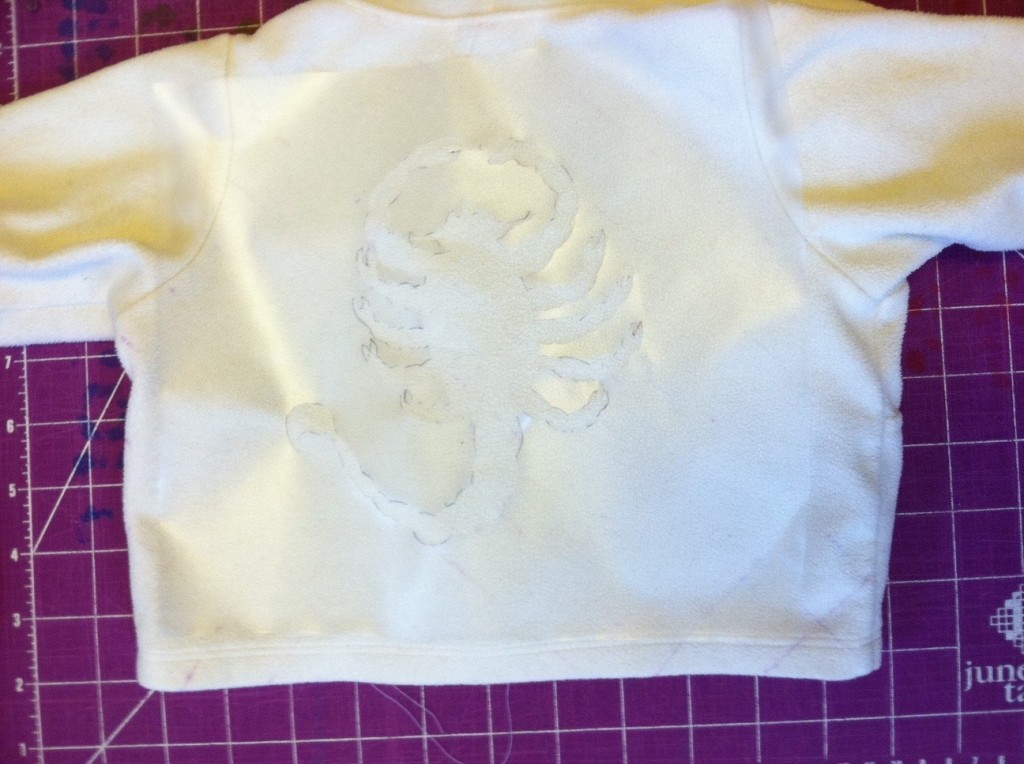
3. Peel off the paper backing of the contact paper and press the stencil onto the back of the jacket.

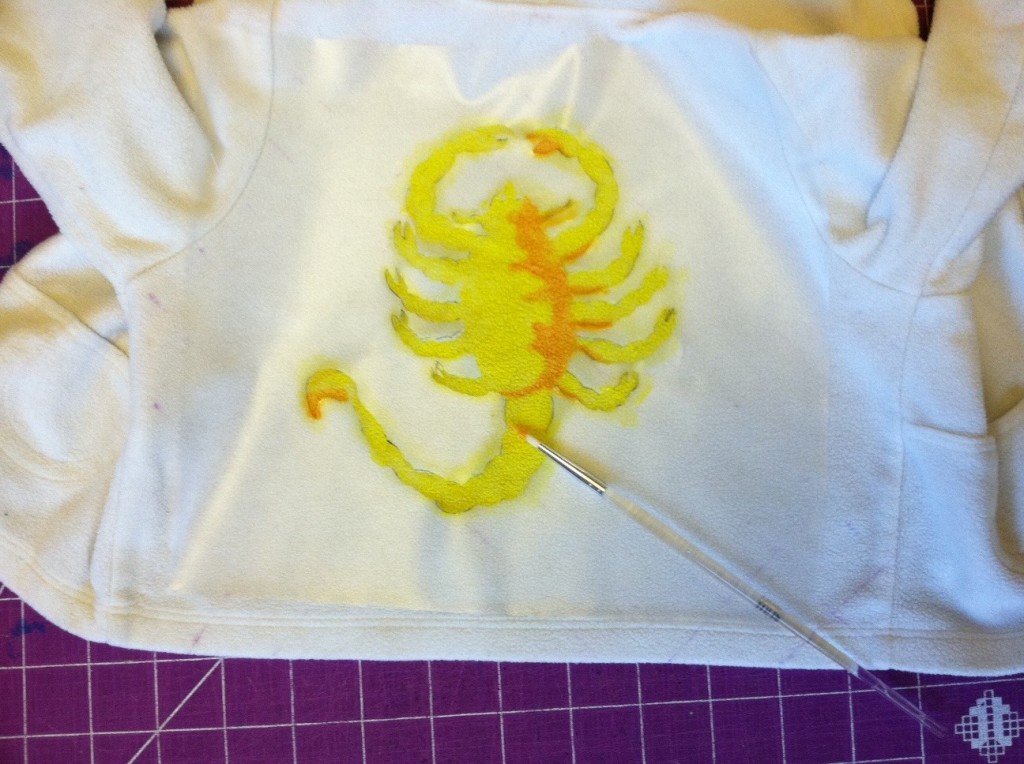
4. Paint the entire scorpion shape with yellow paint. (Use spray paint or paint it on with a brush for more control.)

5. Paint some highlights on the scorpion in orange to show the shadows.

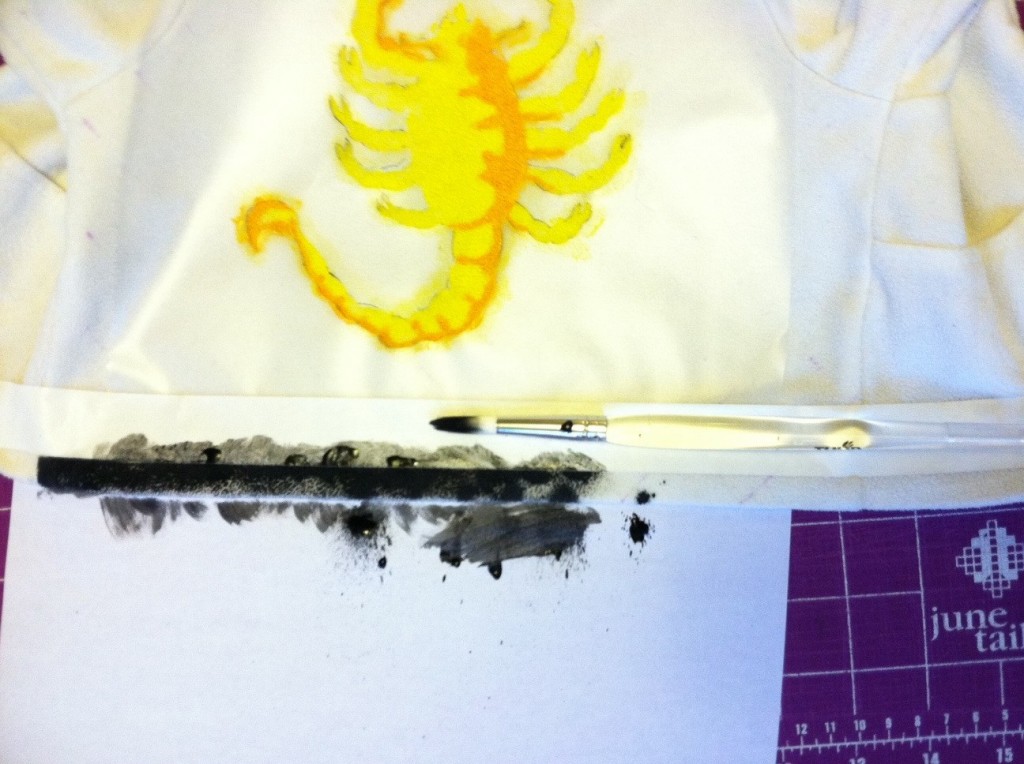
6. Line the bottom edge of the jacket, the sleeve ends, and the shoulder seams with masking tape and paint them black.

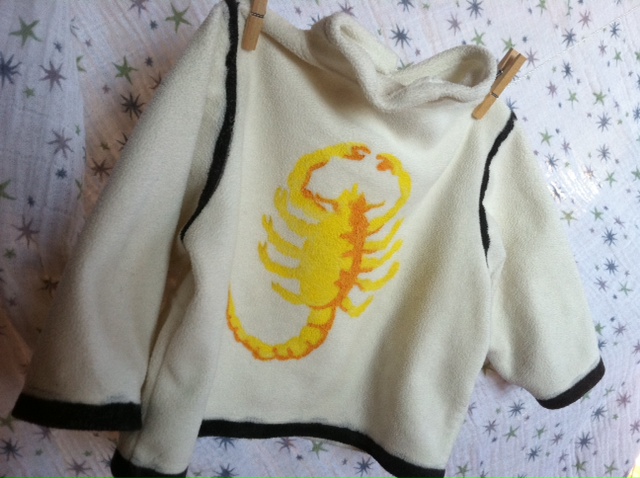
7. Let the paint dry completely and carefully peel off the tape and stencil. Optional: If the jacket has a hood (mine did), cut and hem it to create a collar (because I’m nerdy like that, and I’m going for authentic!).

8. Try the jacket on your littler driver. Okay, so he can’t even hold his head up yet, but he sure knows how to grip the wheel! Next up: Get him a driver’s license…in 16 years.

I love this stencil!! Now to apply it to a T-shirt…or what about painting a scorpion wrapping around the bottom of a pant leg or stockings?

Photo of Ryan Gosling via FirstShowing.

[ 10 Comments | Posted on February 28th, 2012 ]

Crafting with the Next Generation

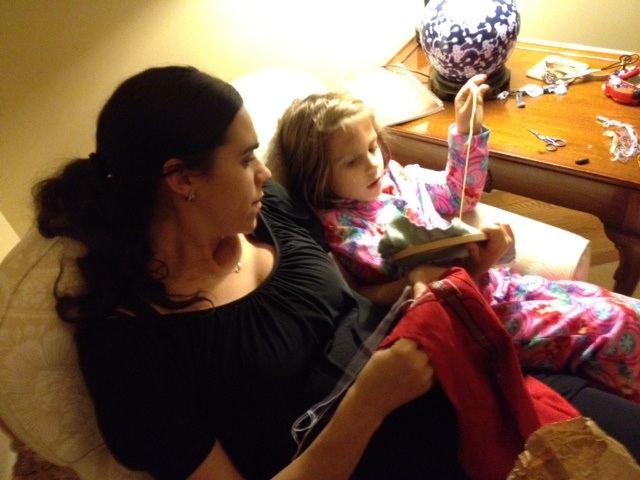
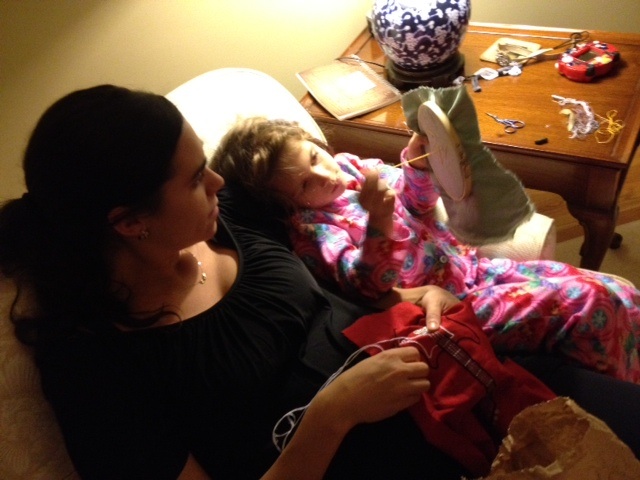
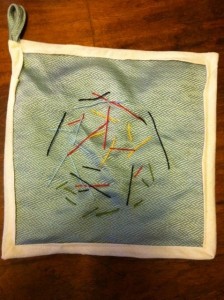
After Thanksgiving dinner with my in-laws, we all settled into the living room for some Wii karaoke and Wii dance party, and I, in my 8-months-pregnant state, settled into an armchair to work on an embroidery project I was trying to finish before the little guy arrived. It wasn’t long after I sat down that my young niece snuggled in next to me and asked, “Aunt Megan, can I do what you’re doing?” Though I wasn’t quite ready to pass my project into the hands of a 5-year-old, I did have a spare needle, plenty of floss, and was more than happy to share my hoop. (I was also rather giddy that she had taken such an interest in what I was doing!) I suggested that we ask her grandfather whether he had a fabric scrap she could work on (he used to work in the interior decorating business and always seemed to have plenty of spare yardage), and sure enough he came back from the garage having clipped a corner of textured, shiny, sea foam green upholstery fabric for her to work on.

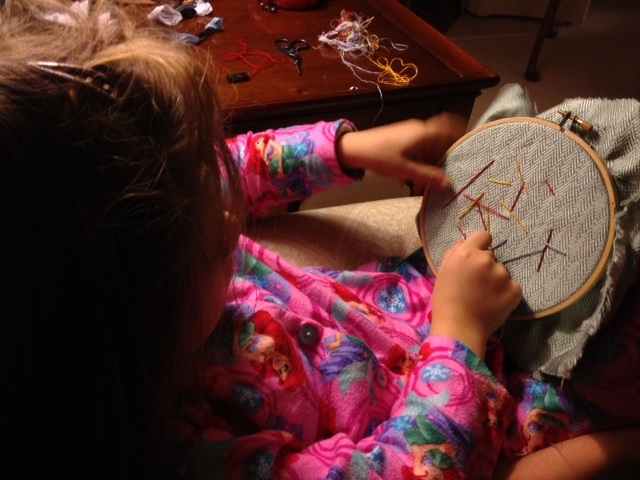
I helped her sandwich it in between the rings of the hoop, let her choose a color, and threaded the spare needle. And she started stitching…and stitching…and stitching! Long stitches and short stitches, cross stitches and straight stitches — only pausing for me to tie off an end and change the thread color under her creative direction. I asked her what she was making. “Oh! This is a mini-blanket for the baby. For him to snuggle with….” she replied. We talked about me helping her make a back to the mini-blanket and finishing the edges when she was ready.

Below, the young seamstress at work — she never once made the freshman mistake of stitching around the hoop, rather than just up and down through the fabric. (I was impressed. I don’t think I can say the same for my first embroidery experience!) The next morning, she declared herself finished with that piece of fabric, handed it off for me to take home to Brooklyn to finish, and started work on a black and white gingham pattern which allowed her to practice making short, even stitches by following the pattern on the fabric.

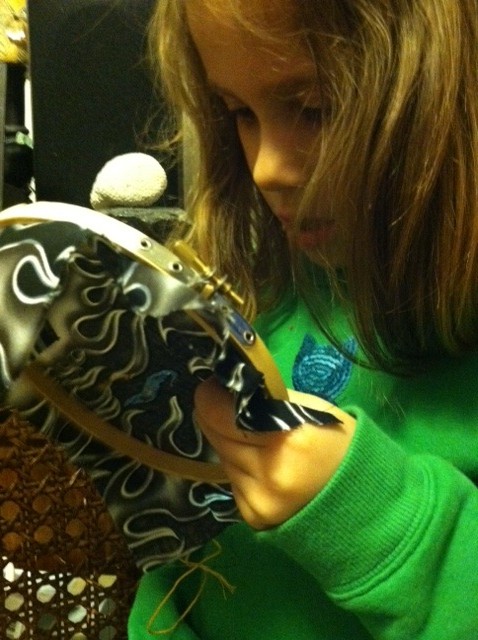
Fast forward to the day after Christmas — the little guy had arrived, and my niece was in New York to meet her new baby cousin. She asked if we could sew again. I reminded her that we needed to choose a back panel for the mini-blanket! So we sat down with my fabric stash in the Generation T workroom and flipped through scraps until she spotted the black and white flame fabric  — I had purchased it several years ago in Portland, Oregon (to make a quilted throw pillow for Mr. T — back before he was Mr. T) while I was on book tour for Generation T. I also used it as the backing fabric for the electric bass, so there’s definitely a theme! We cut a swatch, threaded a needle, and she began tracing the flames with embroidery floss.

When she left, I embroidered her initials on her work, pinned the pieces together and used some scrap muslin to edge the mini-blanket. I also added the loop, which yes I recognize makes it look a little like a potholder, but also allows me to tether it to the stroller!

And no complaints from this little guy about his new handmade mini-blankie! He loves to snuggle with it and grip the edges tightly.

I can’t wait until the next project my niece and I make together! And here’s to the next generation of DIYers — I can’t wait till this little guy is gripping some scissors in his little hands, too!

[ 8 Comments | Posted on January 30th, 2012 ]

How To: Embroidered Electric Bass Softie

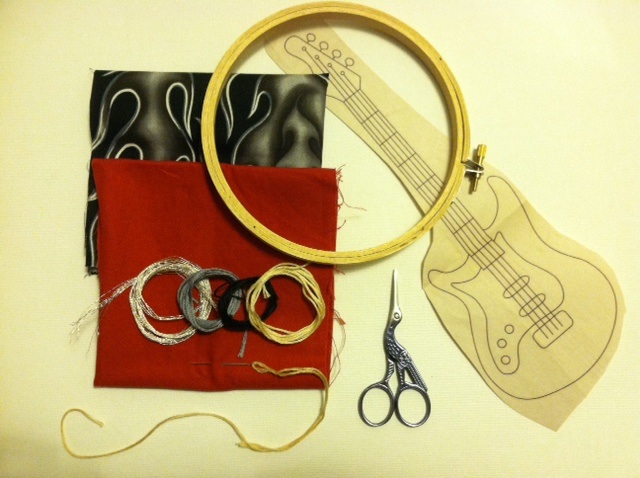
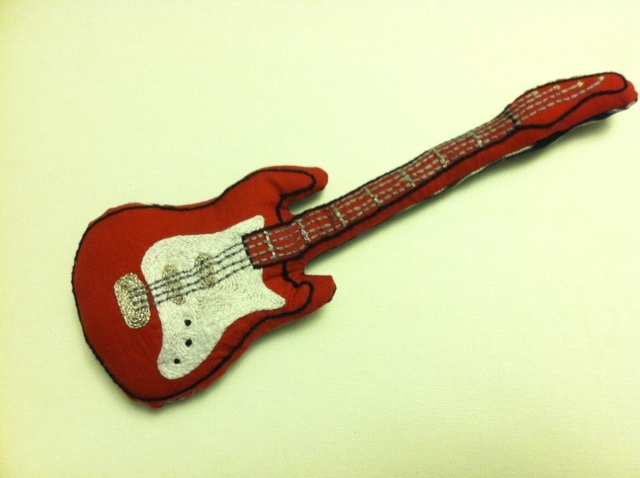
Happy New Year! With all the baby prep in the final months of 2011, I finished one craft project not-exactly-in-time-for-baby, but in time for Christmas. I began this embroidered bass guitar a couple of months ago, after finding the pattern in a local sewing shop. Though most of the designs in the envelope were intended (so suggested the text on the packaging) to be applied to tea towels or pot holders or grocery totes, I immediately envisioned this one as a softie toy for my soon-to-arrive little rock star. And, well, all I can say is that he seems to be taking to it quite naturally.

Materials:
-Solid color cotton quilting fabric to embroider
-Patterned cotton quilting fabric for backing
-Electric Bass Iron-on Pattern (in Colonial Patterns “SR4 Rock’n & Roll’n”)
-All-purpose scissors
-Iron and ironing board
-Wooden embroidery hoop
-Embroidery floss in white, black, silver, and slate blue
-Embroidery needle
-Embroidery scissors
-Straight pins
-Sewing machine and thread
-Fiberfill

Make it:

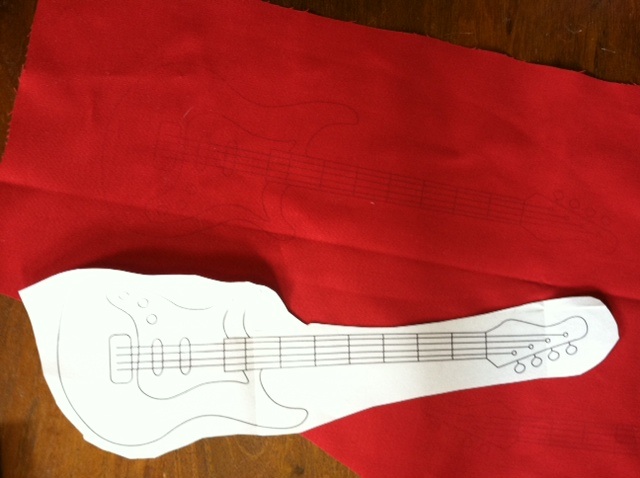
1. Cut out the iron-on pattern and place it face down on the plain fabric. Follow the instructions on the pattern packaging to press and transfer the image with a warm iron.

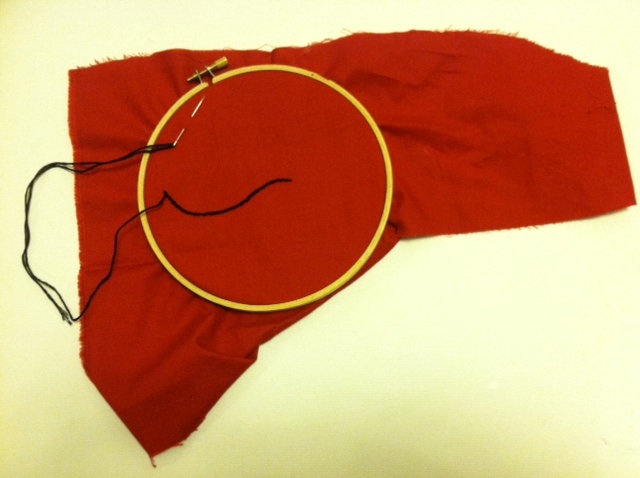
2. Thread the needle with an arm’s length of black embroidery floss. Use four strands for each stitched segment of the design. I outlined the bass in black with a split stitch, used split stitch fill in white for the pick guard, split stitch and split stitch fill in silver for the frets, pickups, bridge, and tuning keys, used backstitch in slate gray for the strings, and finished off the control knobs with French knots in black.

3. When the stitching is complete, carefully cut about 1/2″ around the black outline stitching. Place the embroidered piece against the backing fabric, right sides together, and cut around the shape to create a matching back piece. Pin the edges and, leaving a 1/4″ seam allowance, sew a running stitch around the pinned area. Leave a 2″ opening at one end. Remove the pins and turn the fabric right side out. Stuff with fiberfill, making sure all the “corners” get filled first, and hand stitch the opening closed.

4. Put it in the hands of an eager young musician.

[ 2 Comments | Posted on January 1st, 2012 ]

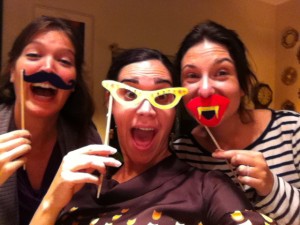
I Love to Create: Costume-on-a-Stick!

‘Twas the week before Halloween and all through the haunted house,
every creature was stirring–

the zombies, the mummies, the vampires, the flappers, the secret agents–

even the mouse.

But if you’re the one caught without a disguise,
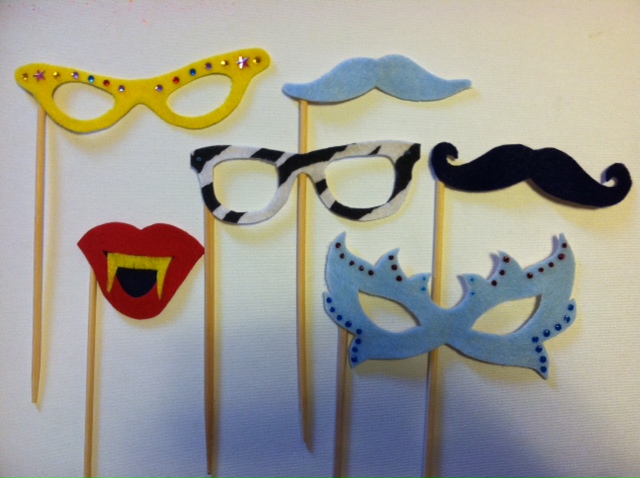
make a costume-on-a-stick to cover your mouth or your eyes!

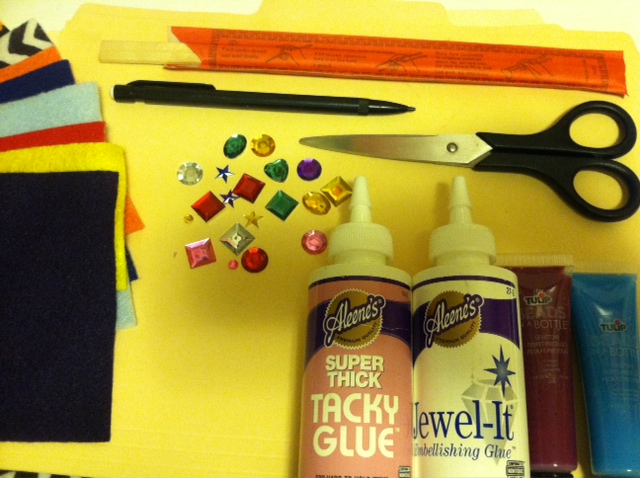
Materials:
-Pencil
-Paper (optional)
-Manila file folders
-Scissors
-Felt pieces in a variety of colors and patterns
Aleene’s Super Thick Tacky Glue
Aleene’s Jewel-It Embellishing Glue
-Fake jewels
Tulip Beads in a Bottle
-Wooden chopsticks

Make it:

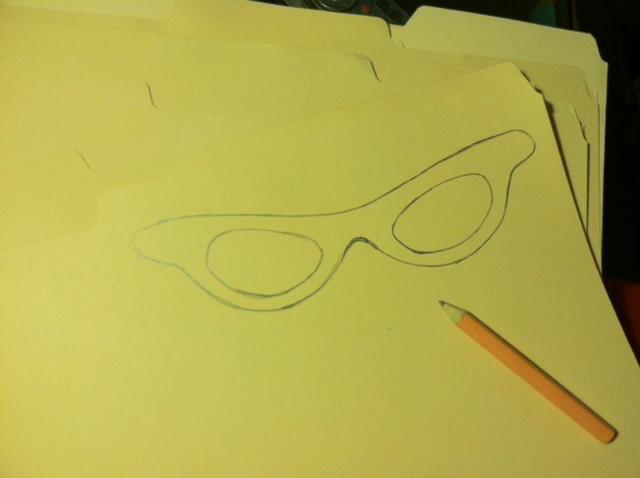
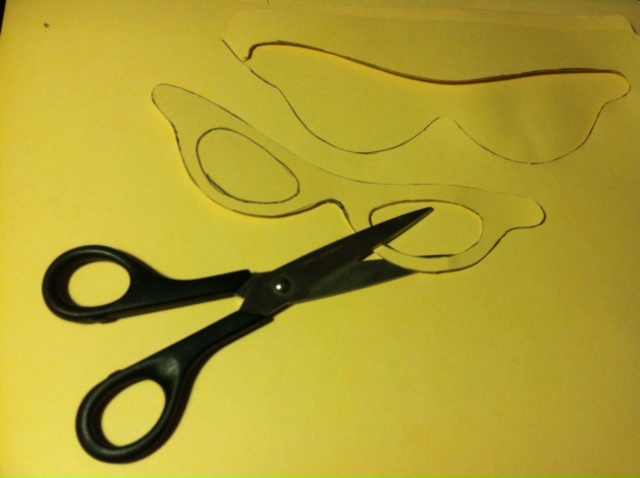
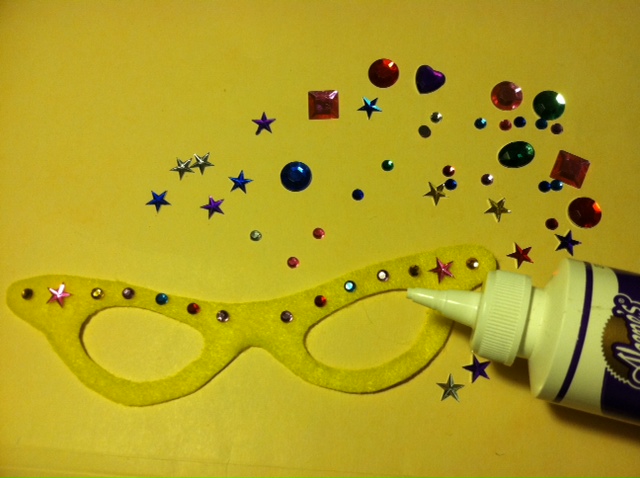
1. Draw the outline of a pair of glasses, a mustache, or other shape on a manila folder. Optional: Sketch it out on a piece of paper first to use as a template (this way, if it’s a symmetrical shape, you can fold it in half to make sure both sides match), then cut it out and trace it onto the folder.

2. Use scissors to completely cut out the shape(s).

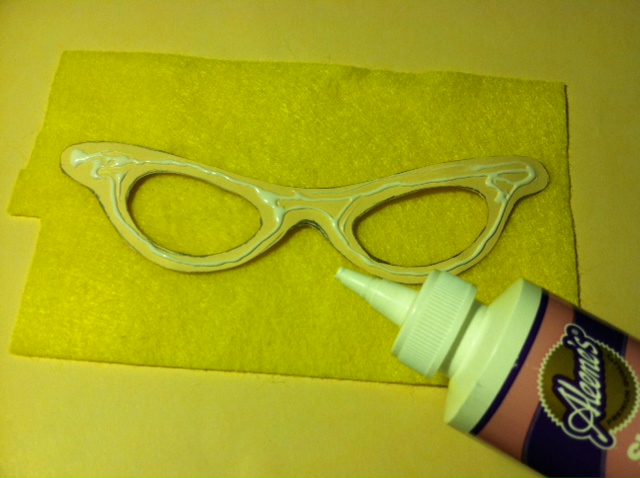
3. Spread glue generously over the back of the folder shape.


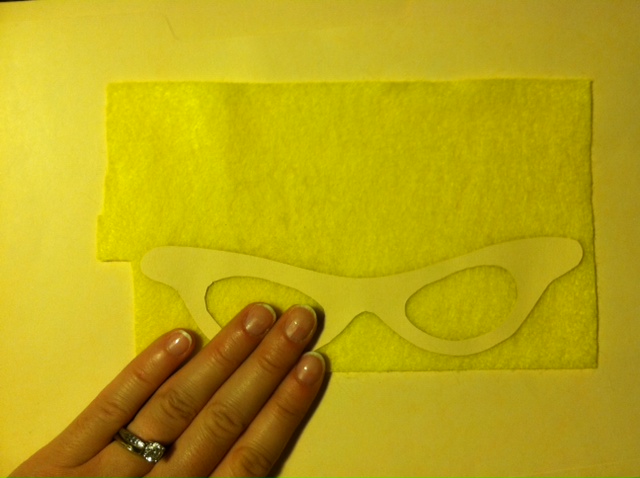
4. Press it firmly onto a piece of the desired felt color. Let the glue dry.

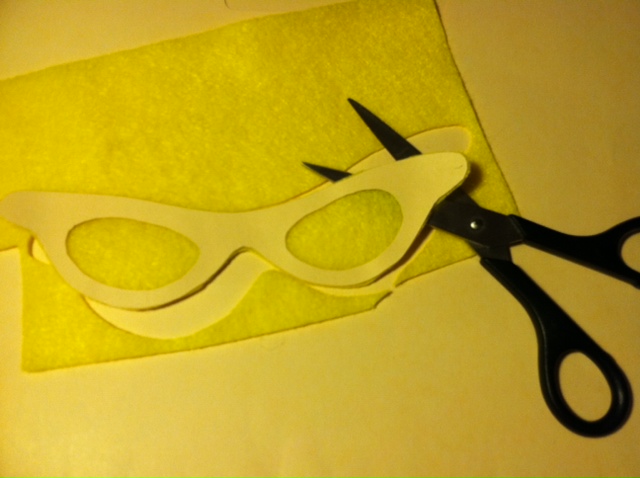
5. Cut out the felt piece, using the folder edges as your guide.

6. Use jewelry adhesive to decorate the front with fake jewels…

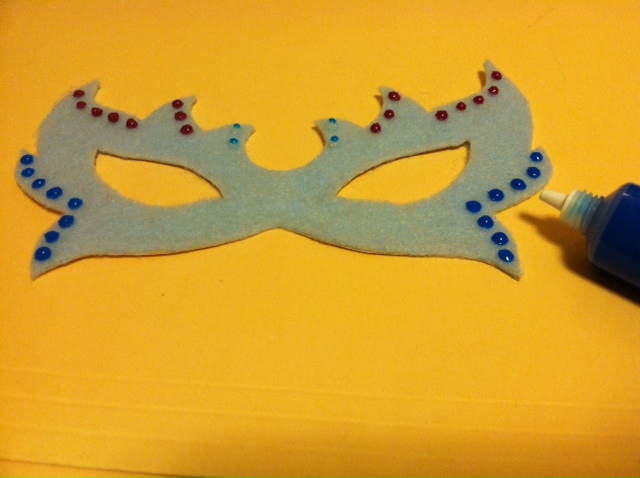
…or use Beads in a Bottle to create 3D embellishments! Let the embellishments dry.

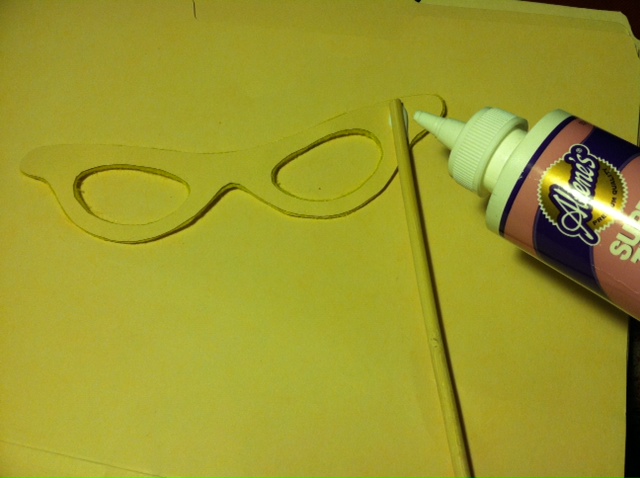
7. Flip the disguise over and squeeze a line of glue along one side. Press the top of one chopstick so it extends vertically from the bottom. Let it dry.

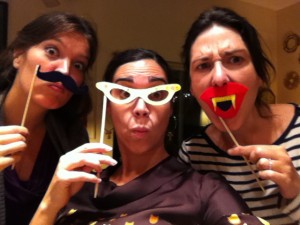
8. Repeat as many times as you like to make cat-eye glasses (shown), wayfarers, masquerade masks, vampire fangs, and mustaches galore. Now what are you waiting for? Go undercover!

Happy haunting from Generation T!


[ 3 Comments | Posted on October 25th, 2011 ]

I Love to Create: Studded Leggings!

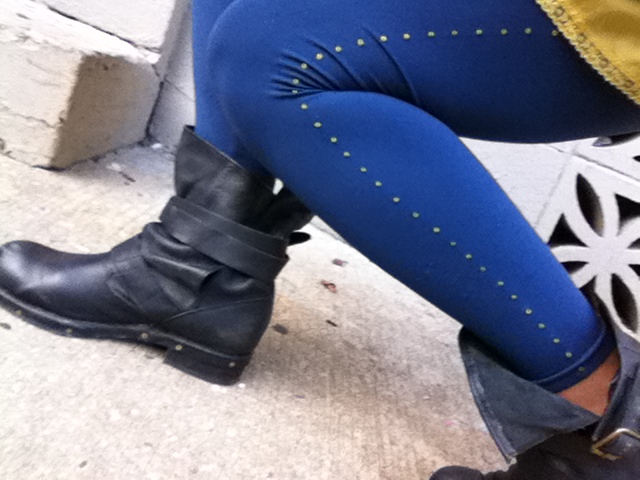
I spotted a pair of studded leggings in a magazine once, and though they were just for styling, not for sale (I would have snatched them in an instant!), perhaps it was actually a lovely DIY blessing so that that years later, when I unpacked my tubes of Beads in a Bottle for the first time, I’d know just what to do. I pulled the slightly wrinkled page from my “future inspirations” notebook and set to work!

Materials:
-leggings or footless tights
Tulip Beads in a Bottle paint in desired colors
-chalk marker
-ruler or straightedge
-iron (optional)


1. Prewash the leggings and let them dry completely. Fold the leggings so the sides are facing out. Find the center line down each leg, from hip to ankle and use the ruler and chalk marker to mark dots 3/4″ to 1″ apart along that line. Optional: Set the iron to a low setting and press the leggings flat to make a crease along the outside of each leg before measuring the dots.

2. Select a Beads in a Bottle color to match or contrast the leggings (though you can’t tell from the late-night craft lighting in the photos, I was working with blue leggings, so I chose a light yellow for nice contrast). Make sure the leggings are on a flat surface, with your marked dots facing up. Hold the tip of the tube about 1/16″ above the first dot and gently squeeze out the paint to form a bead. Note that the beads shrink slightly when they dry, so be a little generous without going overboard.

3. Continue adding dots along the length of the legging until you reach the hip, making sure to lift the tip of the tube straight up after you’ve applied the bead to prevent smearing. Note: If plan to wear your leggings with that hot leotard you have hiding in the back of the closet, you may consider extending the line of dots waistband-high, but otherwise, you only need to squeeze beads up to the hemline of your skirt, shorts, or dress.


4. If you can lay the second leg flat without disturbing the wet beads on the first leg, do so, and repeat steps 2 and 3 to complete the look. Otherwise, let one side dry completely (about 4 hours) before dotting the other side.


5. Let both sides of the leggings dry and get ready to rock them! The beads dry three-dimensionally, so you do get a slightly studded effect that can be seen when silhouetted from the front. Cool, very cool.

Variations: Experiment with different patterns — zigzag your beads down your legs, cluster them around the ankles so they “explode” up the leg, or apply them in a nice line up the back of each leg–reminiscent of old-school seamed pantyhose.


[ 3 Comments | Posted on September 27th, 2011 ]