Adventures

Adventures at CHA 2011

Here are some highlights of the people, places, and products I visited (along with my friend and partner in crafty crime, Sonya Nimri, author or Beadalicious and Just for the Frill of It) while exploring the floor for three days at CHA 2011. (They’re a little out of order, so forgive the costume changes!)

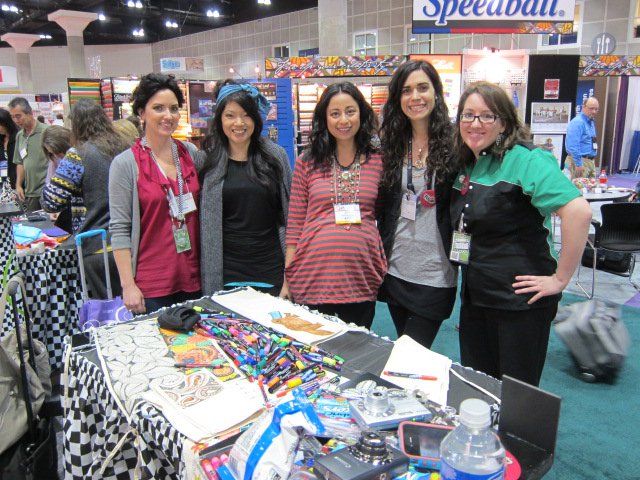
First off, Sonya and I met up with mixed media artists Alisa Burke and Traci Bautista, and graphic designer Alexa Westerfield at the iLovetoCreate booth.

Sonya and I just had to drop our bags and park ourselves at the iLovetoCreate make-and-take that Alisa was running–coloring a craft apron with Tulip and Crafty Chica fabric markers! The results are below–a Generation T especiale with measuring tape, scissors, T-shirt, and pin cushion by me–and two platypuses in love by Sonya.

The mannequins at the iLovetoCreate booth had some crazy-mazing get-ups thanks to many of their creative staffers and bloggers!

Then I learned to crochet for the second time (here was my first attempt) at the Simplicity booth with Drew Emborsky, aka the Crochet Dude. I completed a silver and black sparkly necklace in about 20 minutes = success!

We met up with fellow iLovetoCreate bloggers, Kathy Cano-Murillo, Margot Potter, and Avalon Potter.

I bumped into Sublime Stitcher Jenny Hart, who was at CHA to cover the event for Craftzine, and met Cathy Callahan, author of the forthcoming Vintage Craft Workshop (due out Spring 2011). We couldn’t resist posing beneath this cheery paper flower arbor.

Speaking of colorful settings, Sonya and I hug it out at the dreamy Red Heart lounge where they were celebrating 75 years!

In the “innovation hall,” make-your-own silly bands at Shapelets were a hot stop. And while we noted that Silly Bandz are so over in an even-the-SillyBandz-company-was-selling-snap-bracelets-at-the-recent-NY-Gift-Show kind of way, making Shapelets was refreshing for its DIY spirit of self-expression. Those are my star-shaped bands cooling on the pegboard along with Sonya’s completed mushroom bands!

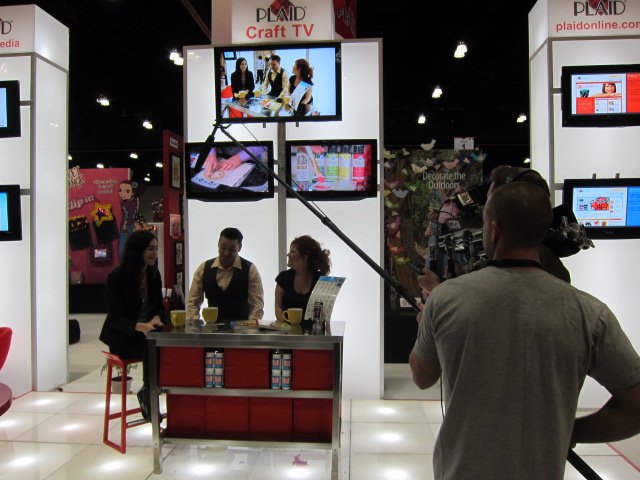
I stopped for an impromptu interview with Cathie and Steve on Plaid Craft TV — they have a new web show coming out soon, so check it out!

And look, while they were interviewing me, Sonya’s segment from Plaid Craft TV was playing on the lower right monitor!

Here we are with Cathie and Steve — along with Amy Anderson, chief blogger at Mod Podge Rocks!

We stopped in to play with Melody Ross’s ChipArt tools–but forget chip board, we hammered words and initials to personalize leather bracelets at this make-and-take!

Everybody remember everyone’s favorite 3rd-person-speaking, faux-hawked contestant on Project Runway Season 5? Suede was at the far end of the Simplicity booth, signing copies of his new patterns and–what have we here?–refashioning T-shirts. Here we are with two of his laced-up, fringed-up, tied-up tees.

Non sequitor: I’m just in love with these framed disembodied hands and lanterns. I want them for my wall. (P.S. They’re from Tim Holtz‘s Idea-ology booth.)

Blogger meet-up! Stefanie Girard of Sweater Surgery, the Creative Craft Goddess Vicki O’Dell, Jenny Barnett Rohrs of Craft Test Dummies, and Jon Lee of Provocraft.

One of the finalists from So You Think You Can Dance Season 4, spinning on his head in a dance-off at the Provocraft 5-year birthday celebration for the Cricut. I think that’s a solid way to wrap up the round-up, right?

Oh, but while he’s spinning on his noggin, I’m not quite done… I’ve exhausted my photos, but the other sweet happenings included meeting Heather Mann of Dollar Store Crafts, the VP at Colonial Patterns (the company responsible for the Aunt Martha’s robot embroidery iron-ons), Kristen Turner of Threadbanger’s VainGlorious, and Ohio Knitting Mills author Steven Tatar.

And, the make-and-takes kept coming: from paper flower brooches, to etched glass, to paper-wrapped bangles, to old-school friendship bracelets. Another highlight of the weekend was the flip book that Sonya and I made at the entrance to the Cricut birthday party–it’s like a party photo booth turned up to 11–lots of costume props, plus 7 seconds to move around and goof off, then it’s printed, cut, and stapled into a mini personalized flip book!

So that’s it…until next CHA!

[ Comments Off on Adventures at CHA 2011 | Posted on February 15th, 2011 ]

More Fun

Happy Valentine’s Day from Generation T!

Here’s to a heart-filled Happy Valentine’s Day (from a goofy, lovestruck Megan at the Red Heart lounge at CHA). To celebrate, here are two totally heartsy, craftsy T-shirt projects for him and her! But if you’re not feeling the T-shirt love today, here are ten quirky, clever, full-of-love DIY projects that we also totally heart:

1. PB&J Heart Thumbprint Cookies via MyKidsMake.

2. Knit Heart Ring via CutOutandKeep.

3. Softie Smoochie Lips via Diana Schoebrun.

4. Sweet Nothings Mini-Megaphone via DesignSponge.

5. Heart Garland via FamilyFun.

6. Vintage Spool Valentine via CutOutandKeep.

7. Embroidered Portraits via CountryLiving.

8. Ch-ch-ch-chia Heart from FamilyFun.

9. Heart Cake via IAmBaker.

10. Love Potion #12 Signature Cocktail via Care2.

[ Comments Off on Happy Valentine’s Day from Generation T! | Posted on February 14th, 2011 ]

Events

Plymouth, NH @ Holderness Artward Bound

Because there’s nothing quite like March in New England, I’m heading north with Generation T to spend quality time with some creative teenagers at Holderness School as part of an artist-in-residency program called Artward Bound (like Outward Bound, but with art!). I’ll be sharing the time and space with eight other artists, who are all working around the central theme: Re-make it New. According to the mission and description of the 2011 program, we will “explore and celebrate…invention and resourcefulness. Re-source, re-use, re-make, re-balance, re-mix, reflect are the keywords that allow us to effectively tap the past, within the present, in order to construct a creative and sustainable future. Artists and performers of every kind are confronted with the daily challenge of making something new out of what is before them. It is said, ‘Necessity is the mother of invention.’ Never has that been more true, than in the eco-era of today. Invention is the ability to bring dissimilar ideas, tools, experience, and materials together in ways that surprise, instruct and lead.” That sure sounds all right to me!

Though the daytime class sessions are private, the evening performances are open to the community (including two eco-fashion shows premiering my students’ T-shirt refashion work) , and I’ll be posting more information about them as it becomes available. In the meantime, we’ll be sure to post plenty of pictures to share our progress throughout the two weeks that we get creative together!

Materials for the Generation T fashion workshops have been generously provided by the following sponsors:

[ 2 Comments ]

Adventures

Megan Loves To Create: Refashioned T-shirts!

Amidst my recent adventures out at CHA (full round-up to come soon!), I was impromptu-interviewed by Alexa at iLoveToCreate who was dying to know what it is that I love to create. You all probably know that answer (Exhibit A: title of this post, above; Exhibit B: titles of books, right), but in case you needed more visual and verbal proof, please see Exhibit C: the video below…

I know, total newsflash, right?

PS: It took everything I had to keep my scissors (that glowing orb in the screen grab above) off that T-shirt to my left. But speaking of that T-shirt, what a great Valentine’s Day project, don’t you think? Pick up some super-glam iron-on crystals to celebrate your loooove.

[ Comments Off on Megan Loves To Create: Refashioned T-shirts! | Posted on February 9th, 2011 ]

More Fun

From Our Readers: Izzy!

Izzy from New York made the T-shirt laptop cozy included in the 8 Ways to Transform a T-shirt roundup we featured back in December, and get this…she made it without even looking at the instructions! Very cool. It’s pretty impressive to be able to look at a finished project and figure it out in reverse — and have it come out looking as awesome as Izzy’s project does! Not to mention, she reports that she had tons of fun making the laptop cozy, too–which is of course, pretty darn sweet.

[ Comments Off on From Our Readers: Izzy! | Posted on February 7th, 2011 ]

More Fun

T-Shirt Art: Woven Team Jerseys

To celebrate Super Bowl Sunday Generation T-style, check out these amazing tapestries woven from sports jerseys by artist Brian Jungen. Beautiful patterns and color combinations! A Steelers-Packers woven mashup would sure look nice–all those bright colors! In the meantime, I’m going to dig out some of my old “home” and “away” team uniforms and start cutting.


[ 3 Comments | Posted on February 5th, 2011 ]

More Fun

From Our Readers: Jessie!

While I was wandering the halls at CHA in Southern California (more details to come!), there was a surprise Tee Party brewing up north in the Bay Area. It was Jessie’s 12th birthday, and she and six of her pals were quick to dig into a pile of her brother’s old tees (excellent source, by the way), scissors, fabric paints, and copies of Generation T and Generation T: Beyond Fashion (of course) and styled a whole new wardrobe.

They each made a version of Outer Lace (project #16 from Generation T). And, they even choreographed dance moves to stretch out the T-shirt hems into cords!

Fashionably, they used their scrap pieces as headbands, bracelets, and other accessories.

They swapped T-shirt cords so they could each have contrasting color laces down the sides.

And when the birthday girl has an ear-to-ear grin to rival Cookie Monster’s, you know it’s a success!

Want to throw your own Tee Party? Here’s how.

[ 3 Comments | Posted on February 3rd, 2011 ]

Events

Los Angeles, CA @ CHA Winter Convention

Each winter, sunny California is host to the largest craft convention in the biz, organized by the Craft & Hobby Association. Though I’m not participating in any formal events this year,  I will be happily roaming the aisles on Saturday, Sunday, and Monday (January 29, 30, and 31), stopping in to some of my favorite booths (like iLovetoCreate, Prym Consumer USA, ProvoCraft, SewNews…) and catching up with some of my favorite crafty folks (Sonya Nimri, Jenny Doh, Cathie Filian, Kathy Cano-Murillo, Mark Montano, and more!). If you’re in town and roaming the floors, too, don’t be shy — say hello!


[ 2 Comments ]

T-shirt Projects

I Love to Create: T-shirt Baby Book!

I like projects that help me use up the scraps that threaten to overwhelm my craft space. I also like projects that can be gifted. So this one’s a win-win: The T-shirt Baby Book is perfect for using the T-shirt sleeves that have been cut from another project (like a tank top) and it makes a great personalized baby gift. Once I picked the recipient (my friend’s new baby, Elliot), I had a lot of fun figuring out what words each letter of his name would represent (in other words, what could I illustrate easily?). I settled on: E = earth, L = light, L = love, I = ice cream, O = orange, and T = tree. Sorry, no pictures of baby Elliot and his new book just yet, so the book is presented by these two cute corduroy pals.

Materials:

-T-shirts or T-shirt scraps (in multiple colors)

-Scissors

-Ruler

-Craft knife

-Cutting mat

-Lightweight cardboard (cereal, snack, or tissue boxes work great!)

Aleene’s Fabric Fusion Permanent Dry Cleanable Fabric Adhesive

Tulip Disappearing Ink Pen

Fabric paintbrushes

Tulip 3D Fashion Paint Blazin’ Brights (variety of colors)

-Clothespins (optional, for clipping in place while gluing/drying)

Make it:

1. Measure and cut one more 4″ x 4″ square of cardboard than there are letters in the baby’s name. (Example: Elliot has 6 letters, so I cut 7 squares.) Then cut as many 5″ x 10″ rectangles from the T-shirts as there are cardboard squares.

2. Squeeze a small ribbon of glue along one long side of one of the fabric rectangles. Then fold over the edge about 3/8″ and press. Repeat on the other long side.

3. Find the center of the rectangle and line up one edge of one of the cardboard squares. Squeeze a small ribbon of glue along the fabric at the top and bottom edge of the cardboard.

4. Fold the fabric in half, sandwiching the cardboard in between the layers. Press the glue into the edges to seal it. Squeeze another ribbon of glue against the cardboard and between the fabric layers on the open side. Press it closed.

5. Repeat steps 2 through 4 until all of the cardboard squares are covered. These are the pages of the book.

6. Use the air-soluble ink pen to begin outlining the letters and images on the book pages.

7. Color in the lines with fabric paint!

8. Paint all the right-folio pages first (including the front cover), let them dry, then paint all the left-folio pages, making sure you match up all the letters and images.

9. Trim the raw edges (the side of the pages that will go into the binding) down to 1/2″. Then squeeze a line of glue along one of the edges you just trimmed and press it against the adjacent page. Keep gluing and adding pages (in the correct order!) until the book is complete.

10. Let dry completely. Optional: Clip the binding closed with clothespins while it dries.

11. Then it’s story time! E is for earth. L is for light. L is also for love. I is for yummy ice cream. O is also for a delicious orange. T is for Tree (and Totally Terrific and….T-shirt book!).


[ 7 Comments | Posted on January 25th, 2011 ]

More Fun

T-shirt Folding Robot

You can learn to fold a T-shirt swiftly and neatly, origami-style, in just a few easy moves. Or, speaking of robots, you can get your LEGO mindstorms bot to do it for you! How cool is that?


[ 2 Comments | Posted on January 20th, 2011 ]